
Desserts
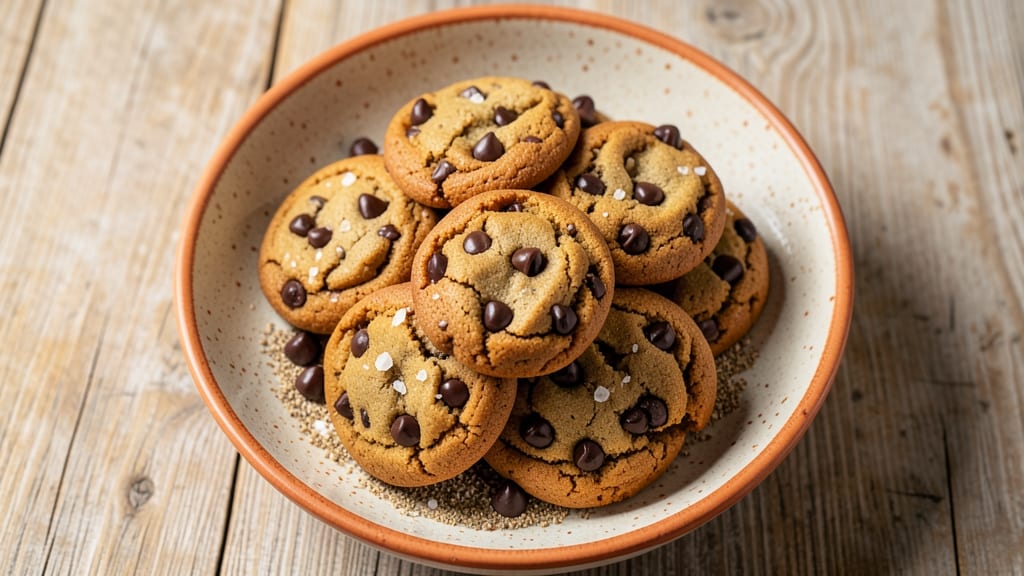
This brown rice flour chocolate chip cookie recipe delivers the perfect balance of nutty depth and melty chocolate centers—all while being completely plant-based. The secret lies in using brown rice flour for a tender yet sturdy texture, paired with flaxseed as the egg substitute.
What makes these cookies truly special is how they avoid common baking pitfalls, ensuring every bite stays chewy and rich without compromising on flavor.
The result is a cookie that's naturally gluten-free, packed with protein, and surprisingly satisfying—no one will guess it's made without traditional flour or eggs.
The brown rice flour adds a subtle earthiness that complements the sweet chocolate chips beautifully, creating a texture that's both crisp at the edges and soft in the center.
Ready in just 12 minutes of baking, these cookies are perfect for snacking, gifting, or sharing with friends who love a healthier twist on a classic treat.
Ingredients for brown rice flour chocolate chip cookie
Gluten-free flours, plant-based fats, and rich chocolate create the perfect vegan cookie experience.
| Ingredient | Amount | Notes |
|---|---|---|
| Brown Rice Flour 🌾 | 1 ½ cups | Gluten-free, finely milled |
| Flaxseed Meal 🌰 | ½ cup | Ground fresh for binding |
| Unsweetened Applesauce 🍎 | ¼ cup | For moisture without sugar |
| Coconut Sugar 🌴 | ½ cup | Lower glycemic than white sugar |
| Extra-Virgin Coconut Oil 🥥 | ½ cup | Solid at room temperature |
| Vanilla Extract 🌿 | 1 tbsp | Pure, alcohol-free preferred |
| Sea Salt 🧂 | ½ tsp | Fine grain, Diamond Crystal |
| Dark Chocolate Chips 🍫 | 1 cup | 70% cocoa minimum, Enjoy Life brand |
| Almond Milk 🥛 | ¼ cup | Unsweetened, for dough consistency |
| Chia Seeds 🌱 | 1 tbsp | Optional, for omega-3 boost |
| Baking Soda 🧪 | ¼ tsp | Pure, aluminum-free |
| Cinnamon 🌿 | ½ tsp | Ground, Ceylon preferred |
The brown rice flour is the star here—sourcing matters. Bob's Red Mill or Anthony's Goods brands are consistently fine and nutty. If you can't find it, white rice flour works in a pinch, though texture will be slightly lighter. The flaxseed meal must be freshly ground for proper binding; pre-ground often loses potency. Enjoy Life chocolate chips are ideal for their melt-in-your-mouth quality and allergen-free guarantee, but any 70%+ cocoa chips will work. The coconut sugar adds caramel notes while maintaining a lower glycemic impact than refined sugar.
No flaxseed? Chia seeds ground into a powder work at the same ratio, though texture may vary slightly. Short on almond milk? Oat milk or soy milk both work, but avoid dairy-free oat milks with added gums—they can make cookies gummy. Coconut oil must be solid when mixed; if your kitchen is warm, chill the dough 15 minutes before baking. The chia seeds are optional but add a pleasant crunch and nutritional boost. For extra richness, fold in 1 tbsp vegan butter with the coconut oil, though it may shorten shelf life slightly.
Store dough in an airtight container in the fridge for up to 5 days—it actually improves with resting. Baked cookies keep at room temperature for 3-4 days in a sealed container, or freeze for 3 months by wrapping individually in parchment. For best texture, let cookies cool completely before storing. Reheat in a 200°F oven for 2-3 minutes to restore chewiness if they've dried out. These freeze beautifully, making them perfect for meal prep or gifting.
Why You'll Love This Recipe
- No-Fuss Mixing: I swear by the applesauce trick—it keeps these cookies tender without extra eggs or butter. Just stir, scoop, and bake. Honestly, my hands are rarely sticky, and the dough never fights me.
- Rich Caramel Depth: The coconut sugar gives a molasses-like warmth that’s way more interesting than plain white sugar. Plus, the brown rice flour adds a subtle nuttiness that makes every bite feel like a little indulgence.
- Packable & Portable: These hold up perfectly in lunchboxes or travel containers. My kids take them to school, and they don’t turn to sad crumbs—just chewy, flavorful cookies that taste fresh hours later.
- Budget-Friendly Batch: Flaxseed meal and brown rice flour are pantry staples that stretch further than all-purpose flour. A single batch costs me less than half what store-bought cookies do, and I get way more cookies. (Yes, even on a Tuesday night.)
Step-by-step instructions for brown rice flour chocolate chip cookies
Mastering these gluten-free cookies requires precision—each ingredient plays a crucial role in texture and flavor.
Combine Dry Ingredients for Optimal Texture
In a medium bowl, whisk together the 1.5 cups brown rice flour, 0.5 cup flaxseed meal, 0.5 tsp sea salt, 0.25 tsp baking soda, and 0.5 tsp cinnamon until thoroughly blended. The flaxseed meal acts as a binder here, replacing eggs while maintaining structure. Sift the mixture lightly to eliminate any potential lumps—this ensures an even distribution throughout the dough.
I like to press the mixture through a fine-mesh sieve once more before adding wet ingredients. This step prevents dense pockets in the final cookies, giving them that classic tender yet slightly crisp exterior we're aiming for. Set the dry mixture aside while you prepare the wet components.
Create the Wet Mixture with Proper Fat Incorporation
In a separate large bowl, combine the 0.5 cup extra-virgin coconut oil (solid at room temperature) with the 0.5 cup coconut sugar. Use a hand mixer on medium speed for 2-3 minutes until the mixture becomes light and fluffy. The coconut oil should become completely incorporated, creating a smooth base that will carry the chocolate flavor beautifully.
Add the 0.25 cup unsweetened applesauce, 1 tbsp vanilla extract, and 0.25 cup almond milk to the wet mixture. Mix on low speed until fully combined—this prevents over-aeration while ensuring even moisture distribution. The applesauce provides natural sweetness without added sugar, while the almond milk creates the perfect dough consistency without over-drying.
Fold in Chocolate and Chia Seeds
Gently fold the 1 cup dark chocolate chips and 1 tbsp chia seeds into the wet mixture using a silicone spatula. Work quickly but carefully to avoid melting the chocolate prematurely. The chia seeds add a subtle nutritional boost while maintaining the cookie's texture—just be sure to distribute them evenly throughout the dough.
Now gradually add the dry ingredients to the wet mixture, folding gently until just combined. Avoid overmixing—you should still see some flour streaks. The dough will be thick and slightly sticky, which is normal given the brown rice flour's properties. If it appears too dry, add 1-2 teaspoons more almond milk to achieve a workable consistency.
Chill the Dough for Perfect Shape
Cover the dough with plastic wrap and refrigerate for at least 30 minutes, or up to 24 hours for enhanced flavor development. This chilling step is critical—it allows the coconut oil to firm up, preventing excessive spreading during baking. The longer you chill, the thicker and chewier your cookies will become.
While the dough chills, preheat your oven to 350°F and line two baking sheets with parchment paper. The oven should be fully preheated before the dough goes in—this ensures even baking and proper cookie structure. I like to use the middle rack for consistent heat distribution throughout the baking process.
Bake for Nutty Depth and Melty Centers
Using a 2-tablespoon cookie scoop, portion the chilled dough onto the prepared baking sheets, spacing them 2 inches apart. The dough will hold its shape well after chilling, but don't press down on the scooped portions—this prevents flat cookies. Bake for 12-14 minutes, rotating the sheets halfway through, until the edges are golden brown but the centers remain slightly soft.
Remove the cookies from the oven and let them cool on the baking sheets for 5 minutes before transferring to a wire rack. The centers should be soft and gooey when pressed gently—this is where the coconut oil and applesauce create that signature melty texture. For best results, serve warm with a glass of almond milk to complement the nutty flavors.
Pro Tips For Making Brown Rice Flour Chocolate Chip Cookie
- CHILL THE DOUGH: Brown rice flour cookies spread fast—literally, they’ll flatten like pancakes if you skip this. Pop the dough in the fridge for at least 30 minutes (yes, even if you’re impatient), then scoop. The wait keeps edges crisp and centers chewy.
- MEASURE FLAXSEED RIGHT: Too much flaxseed meal and your cookies taste bitter; too little and they’ll crumble like sad crackers. Use 1 tablespoon per ¼ cup brown rice flour, mix it with 3 tablespoons water, and let it sit for 5 minutes to thicken. Stir it into the wet ingredients last—this keeps the texture smooth.
- BAKE LOW AND SLOW: Brown rice flour burns faster than regular flour, so crank the oven to 325°F (not 350°F) and bake for 12–14 minutes. Rotate the tray halfway—edges dry out first, and you’ll end up with hockey pucks if you ignore them.
- SWAP COCONUT OIL FOR BUTTER: Extra-virgin coconut oil solidifies in cold dough, making it hard to mix. Microwave it for 15 seconds first, then let it cool slightly—just warm enough to blend smoothly. (Pro move: Use refined coconut oil if you’re sensitive to coconut flavor.)
Storing and reheating this dish
Refrigerator Storage
These cookies stay fresh for 3-4 days when stored in an airtight container at room temperature. The brown rice flour helps maintain moisture better than traditional flours, but I still recommend storing them in a glass container with a silicone lid—it keeps them from drying out.
Place parchment paper between layers if stacking to prevent sticking. For best texture, let cookies cool completely before storing to avoid trapped steam.
Freezer-Friendly
Freezing is the best way to preserve these cookies for 3 months without losing texture. I wrap each cookie individually in parchment paper, then place them in a freezer bag with all air removed. This prevents freezer burn and makes them easy to grab for quick snacks.
When ready to eat, thaw at room temperature for 15-20 minutes or warm in a 200°F oven for 2-3 minutes to restore that melty center. 🥶
Reheating Secrets
If your cookies lose their chewiness, reheating is key. Pop them in a preheated 200°F oven for 2-3 minutes—this reactivates the coconut oil and restores moisture without overcooking.
For a faster option, microwave on low power (50%) for 10 seconds, then let them sit for 30 seconds to redistribute heat evenly. Avoid high heat, which can make the chocolate chips seize up.
Dough Make-Ahead
The dough actually improves when refrigerated for up to 24 hours—the flavors meld beautifully. Store it in an airtight container with plastic wrap pressed directly against the surface. When ready to bake, let it sit at room temperature for 10-15 minutes before scooping.
This makes it perfect for meal prep Sundays—just portion and freeze the dough balls in parchment-lined bags for easy baking later. 📅
Texture Rescue
If your cookies turn out too dry, the fix is simple: brush with melted coconut oil and warm for 30 seconds in the microwave. For overly flat cookies, next time chill the dough 15 minutes longer and use a 1.5-tablespoon scoop instead of 2 tablespoons.
The brown rice flour can be tricky—it absorbs moisture differently than wheat flour, so don’t overbake. Aim for golden edges with soft centers for that perfect balance.
Portion Control
For consistent baking, use a 2-tablespoon cookie scoop (or a #30 disher). If you don’t have one, roll the dough into 1.5-inch balls—they’ll spread slightly but maintain shape. The key is not pressing down when placing them on the sheet.
Overcrowding causes uneven baking, so leave 2 inches between cookies. For thicker cookies, bake 1-2 minutes longer and check at the 12-minute mark.
Nutrition facts
Frequently asked questions
Why does brown rice flour make these cookies different from traditional ones?
Brown rice flour adds a subtle nutty depth and creates a denser, chewier texture compared to wheat flour. It absorbs moisture differently, so these cookies stay soft longer and have a slightly crisp edge. The flour's natural gluten-free properties also prevent spreading, giving them a thicker shape. The trade-off is a slightly heavier bite, but the flavor boost is worth it!
Can I substitute flaxseed with something else for the egg replacement?
Yes! For every 1 tablespoon flaxseed meal, use 3 tablespoons ground chia seeds or 1 tablespoon psyllium husk powder mixed with 3 tablespoons water. Chia works similarly but may make cookies slightly crispier, while psyllium adds extra binding. For best results, let the substitute thicken for 5 minutes before using.
How do I prevent my cookies from spreading too much?
Chill the dough for at least 30 minutes (up to 24 hours) to firm up the coconut oil. Use a 2-tablespoon scoop and place cookies 2 inches apart on the baking sheet. Bake at 350°F for 12-14 minutes—don't overbake! The brown rice flour naturally resists spreading more than wheat flour, but proper chilling is key.
Are these cookies safe for nut allergies?
Only if you use nut-free chocolate chips and almond-free milk (like oat or soy). The recipe itself contains no nuts, but always check labels on chocolate chips and milk substitutes. For extra safety, use Enjoy Life brand chocolate chips, which are certified allergen-free. The chia seeds are also nut-free and safe for most allergies.
Can I make these cookies without coconut oil?
Yes! Replace coconut oil with 0.5 cup vegan butter (like Miyoko's) or 0.4 cup refined coconut oil (liquid form). For other plant-based fats, use 0.4 cup avocado oil or 0.4 cup melted olive oil, but expect slightly less chewiness. Chill the dough 15 minutes extra if using liquid oils to prevent spreading. The flavor will differ slightly but still taste delicious!