
Main Courses
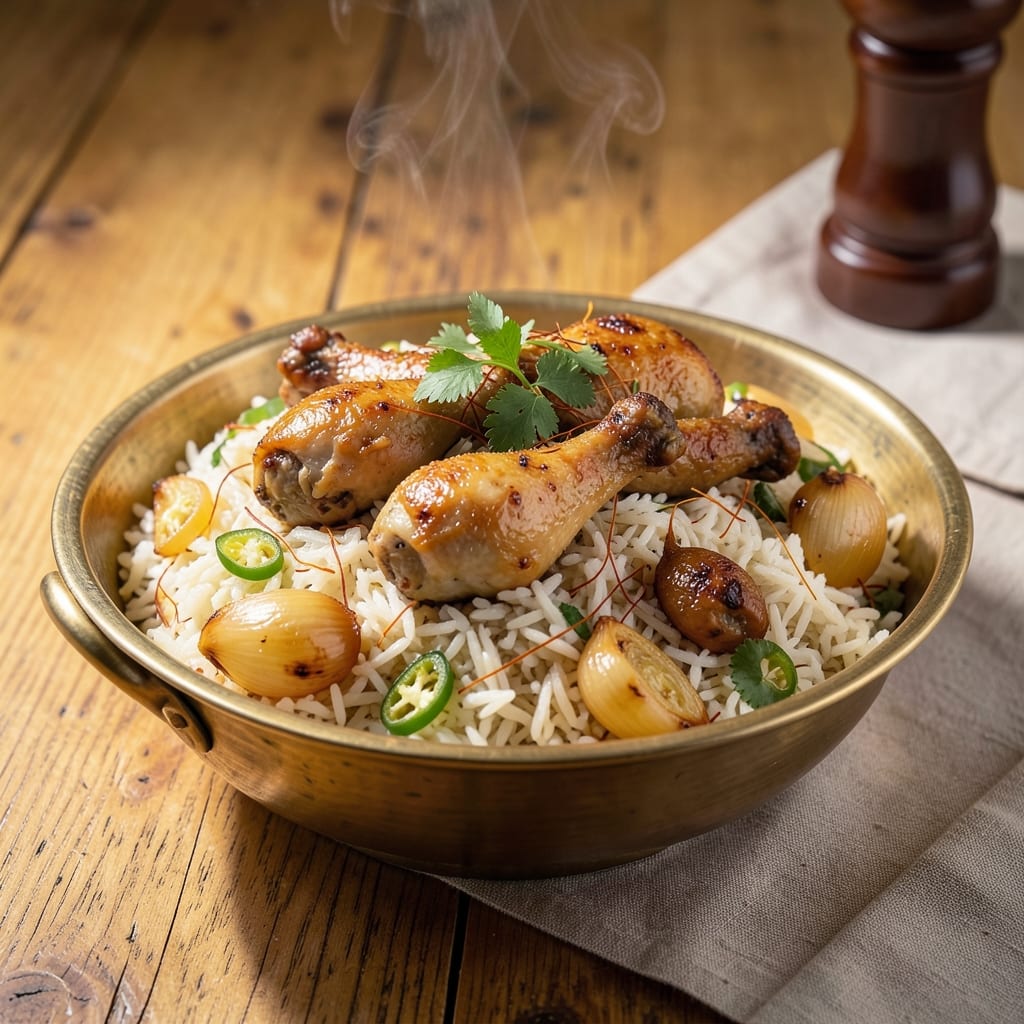
This 2 kg rice biryani recipe transforms a simple meal into a fragrant, layered masterpiece perfect for celebrations or family gatherings. The secret lies in perfectly parboiled basmati rice, tender protein, and aromatic spices that infuse every grain. I’ve refined this method over years to ensure each bite delivers the right balance of texture and flavor—crispy bottoms, fluffy centers, and a symphony of spices that linger long after the last mouthful.
The process begins with slow-cooking protein—whether chicken, lamb, or a mix—until it’s fall-apart tender, then layering it with partially cooked rice and a blend of saffron, cardamom, and cinnamon. The slow cooking in a sealed pot allows flavors to meld deeply, creating that signature biryani aroma that fills your home. Every step is designed to ensure authenticity without sacrificing ease, so even first-timers can achieve restaurant-quality results.
What you’ll end up with is a golden, fragrant biryani where each layer reveals new flavors—crispy onions at the bottom, tender meat, and fragrant rice infused with saffron and spices. The dish is hearty enough to feed a crowd but balanced enough to satisfy even the pickiest eaters. Serve it with a cooling raita or crisp salads to cut through the richness, and watch as everyone reaches for seconds.
This recipe is versatile enough for special occasions or weeknight dinners, with vegetarian adaptations and shortcuts included. The key is patience—letting the spices bloom and the rice absorb all those aromatic flavors. Ready to master the art of biryani? Let’s get started.
Ingredients for 2 kg rice biryani
Two kilograms of basmati rice and aromatic spices create a symphony of layered flavors for celebrations.
| Ingredient | Amount | Notes |
|---|---|---|
| Basmati Rice 🍚 | 2 kg | Long-grain, preferably aged for aroma |
| Yellow Onions 🧅 | 1 ½ lb | Medium, thinly sliced for layers |
| Fresh Ginger 🌿 | 2 oz | Peeled, grated for marinade |
| Whole Chicken Legs 🍗 | 12 pieces | Bone-in, skin-on for flavor |
| Saffron Threads 🌼 | ¼ tsp | High-quality, soaked in warm milk |
| Green Cardamom Pods 🌿 | 10 whole | Lightly crushed for aroma |
| Cinnamon Sticks 🌿 | 4 whole | Broken into small pieces |
| Bay Leaves 🍃 | 4 whole | Fresh for optimal flavor |
| Ground Cumin 🌶️ | 2 tbsp | Toasted for deeper flavor |
| Ground Coriander 🌿 | 1 ½ tbsp | Freshly ground preferred |
| Turmeric Powder 🌶️ | 1 tbsp | Bright yellow for color |
| Garam Masala 🌶️ | 1 ½ tbsp | Homemade or quality store-bought |
| Plain Yogurt 🥛 | 1 cup | Whisked with spices for marinade |
| Vegetable Oil 🫒 | ½ cup | High smoke point for frying |
| Fresh Cilantro 🌿 | ½ cup | Chopped for garnish |
| Lemon Juice 🍋 | 2 tbsp | Freshly squeezed for brightness |
The basmati rice is the foundation—look for aged basmati at specialty stores like Whole Foods or Indian grocery markets for that signature nutty aroma. The chicken legs should be bone-in and skin-on for maximum flavor; Costco or local butchers often carry them in bulk. Fresh ginger and garlic are non-negotiable here—organic produce sections at Trader Joe's or local farmers markets deliver the most potent flavors. For saffron, splurge on Iranian saffron from spice merchants—it's worth every penny for that golden hue and floral aroma. The spices? Penzeys Spices or bulk bins at Indian markets ensure you're getting whole, high-quality spices that haven't lost their punch.
No aged basmati? Jasmine rice works in a pinch, though the texture won't be identical. Short on chicken? Substitute lamb shoulder or extra-firm tofu for a vegetarian version—just marinate it extra long. Running low on saffron? Turmeric adds color, but it won't replicate that floral note. For the yogurt marinade, Greek yogurt works best—it's thicker and holds the spices better. The garam masala should be homemade if possible, but MDH or Everest brand from Indian stores is a solid backup. Fresh cilantro can be swapped for dried cilantro powder, but fresh is always superior when available. For the oil, avocado oil has the highest smoke point if you're concerned about burning.
Store the raw marinade in an airtight container for up to 3 days in the fridge, though it's best used immediately. The cooked biryani reheats beautifully—cover with foil and steam for 10 minutes to restore moisture. Portion into airtight containers for 4-5 days of fridge storage or 3 months frozen. For serving, keep the layers intact—use a large platter to showcase the crispy bottom, tender meat, and fragrant rice. The raita (yogurt sauce) should be served on the side to balance the richness, and extra lemon wedges are a must for that final brightness.
Why You'll Love This Recipe
- One-Pot Magic: I swear by this—just brown the chicken legs in the same pot, layer in the onions and ginger with the rice, then let it steam. No extra pots, no mess, and honestly? That deep, caramelized chicken flavor soaks right into every grain.
- Saffron Luxury: Between us, saffron threads make this feel like a restaurant dish without the price tag. A pinch steeped in warm milk before mixing it into the rice? That floral, honeyed aroma turns ordinary rice into something ridiculously special.
- Feeds a Crowd: Two kilos isn’t just a lot—it’s the amount for gatherings. My in-laws’ birthdays, unexpected guests, or just when I’m lazy and don’t want to cook twice. Leftovers? They’re the best part—reheats like a dream, even better the next day.
- Budget-Friendly Feast: Whole chicken legs are cheaper than breasts, and basmati rice stretches far. I’ll be real: this feeds six for under $15, and the ginger-onion base stretches the flavor like crazy. No fancy ingredients, just pure, satisfying comfort.
Step-by-step instructions for layered spice symphony with fragrant basmati
Master the art of biryani with precise layering and aromatic spice infusion.
👨🍳 Step 1: Marinate the Chicken Legs with Yogurt and Spices
In a large bowl, combine the 12 pieces whole chicken legs with the 1 cup plain yogurt, 1.5 tbsp garam masala, 1 tbsp turmeric powder, 2 tbsp ground cumin, and 1.5 tbsp ground coriander. Mix thoroughly until the marinade clings evenly to the chicken. Add the 2 oz fresh ginger (grated) and 1.5 lb yellow onions (thinly sliced) to the bowl, ensuring all pieces are well-coated. Cover and refrigerate for at least 4 hours, or preferably overnight. This extended marinating period ensures deep flavor penetration and tender meat.
The marinade should be thick but not dry—if it appears too thin, add a splash of water to maintain proper consistency. I press down on the chicken pieces to ensure the spices adhere fully, especially in the crevices. This step is critical for achieving that signature biryani flavor profile where each bite delivers a harmonious blend of yogurt tang, aromatic spices, and caramelized onions.
🔥 Step 2: Parboil the Rice with Saffron and Whole Spices
Rinse the 2 kg basmati rice thoroughly under cold water until the water runs clear, then soak for 30 minutes to remove excess starch. Drain well and set aside. In a large pot, combine the rice with 6 cups water (for a 1:3 rice-to-water ratio) and bring to a boil. Add the 0.25 tsp saffron threads (previously soaked in 2 tbsp warm milk for 10 minutes) along with the 10 whole green cardamom pods, 4 whole cinnamon sticks, and 4 whole bay leaves. Reduce heat to medium-low and simmer for 12-15 minutes until the rice is 70% cooked (it should still have a slight bite).
Drain the rice immediately in a colander, spreading it out to stop further cooking. The rice should be tender but not mushy—this stage is crucial for maintaining its texture during the final cooking process. I use a fork to gently fluff the rice while it drains, ensuring even moisture distribution. The whole spices infuse the water with their aromatic essence, which will later permeate the entire biryani.
🍳 Step 3: Parboil the Chicken and Prepare the Base Layer
Heat 0.25 cup vegetable oil in a large, heavy-bottomed pot over medium-high heat. Remove the chicken legs from the marinade (reserve the marinade) and shake off excess. Sear the chicken skin-side down for 5-6 minutes until golden brown and crispy. Flip and cook for another 3-4 minutes, then remove and set aside. In the same pot, add the remaining 0.25 cup vegetable oil and the reserved chicken marinade. Cook for 5 minutes until the onions caramelize and the mixture thickens into a rich gravy.
This gravy forms the flavor base of your biryani—don't skip this reduction step. The caramelized onions should be deep golden and sweet, with a thick consistency that will later blend beautifully with the rice. If the gravy appears too thin, simmer uncovered for an additional 2 minutes to achieve the desired texture. The chicken should be cooked to 165°F internally, ensuring it's fully tender before layering.
🥘 Step 4: Layer the Biryani with Precision
In a large, deep pot (preferably a heavy-bottomed Dutch oven), spread half of the partially cooked rice as the first layer. Arrange 6 chicken legs skin-side up on top, followed by half of the remaining rice. Drizzle 1 tbsp lemon juice evenly over the rice. Repeat with another layer of rice, the remaining chicken legs, and the final layer of rice. Press down gently to ensure good contact between layers—this prevents shifting during cooking.
The layering technique is what makes biryani unique. Each bite should deliver a perfect balance of rice, chicken, and spiced gravy. I use my hands to create even layers, ensuring no gaps where steam might escape. The lemon juice adds brightness that cuts through the richness of the spices and yogurt marinade. This is where the magic happens—each layer builds upon the previous one to create a symphony of textures and flavors.
🔥 Step 5: Dum Cooking for Maximum Flavor Infusion
Cover the pot tightly with a lid (or aluminum foil sealed with water) and cook on low heat for 25-30 minutes. After 15 minutes, turn off the heat completely and let the biryani steam in the residual heat for another 15 minutes. This dum cooking method traps steam and flavors within the pot, resulting in perfectly cooked rice and tender chicken. The key is patience—don't peek or disturb the pot during this process.
When ready, the biryani should have a fragrant aroma escaping from under the lid, with the rice fluffy and the chicken juices infused throughout. If the rice appears undercooked, return the pot to low heat for an additional 5 minutes. Once done, gently fluff the biryani with a fork, mixing the layers slightly to distribute the flavors. Garnish with 0.5 cup fresh cilantro and serve immediately with additional lemon wedges.
Pro Tips For Making 2 Kg Rice Biryani
- PARBOIL CHICKEN HALF-DONE: The chicken legs won’t finish cooking in the biryani—steam them for 12-15 minutes first, then pat dry. This guarantees tender meat without turning the rice into a stew, and the skin stays crisp when you sear it later.
- LAYER ONIONS LAST: Slice the yellow onions thin and add them to the rice after the dum cooking. They’ll soften perfectly without turning to mush, and the sharpness cuts through the richness of the chicken fat.
- DON’T RINSE THE RICE: Basmati for biryani needs starch—skip rinsing after soaking. A few grains sticking together? That’s the glue holding your biryani’s texture together. (Yes, even if it looks uneven.)
- SAFFRON IN MILK, NOT WATER: Bloom the saffron in ¼ cup warm milk (not water) for 10 minutes before adding to the rice. The milk deepens the color and mellows the bitter edge, making the biryani look and taste luxurious without overpowering the dish.
Essential equipment for great 2 kg rice biryani
Heavy-Duty Dutch Oven
Your heavy-bottomed Dutch oven is the star of this recipe—it distributes heat evenly and retains moisture during the dum cooking process. I recommend a 5-6 quart Lodge cast iron Dutch oven for this 2 kg batch, as it provides enough space for layering while maintaining consistent heat. The deep sides help contain the layers, preventing spillage during the final steaming phase. If you don’t own one, a stainless steel Dutch oven from All-Clad also works well, though it may require slightly more attention to heat control. 🔥
Precision Thermometer
A meat thermometer ensures your chicken reaches the perfect 165°F internal temperature before layering. I swear by the ThermoWorks Smoke—it’s durable, accurate, and has a long probe that fits easily into chicken legs. For the rice, a candy or instant-read thermometer helps gauge when it’s 70% cooked (around 140°F) before layering. This precision prevents overcooking during the final steaming step, which is crucial for that signature biryani texture. Without one, you risk dry rice or undercooked chicken.
Fine-Mesh Strainer
A wide, fine-mesh strainer (like the OXO Good Grips) is essential for draining the parboiled rice efficiently without breaking the grains. After cooking the rice to 70% doneness, spread it evenly on the strainer to stop cooking immediately. This step is non-negotiable—over-draining or mashing the rice ruins the final texture. I also use it to strain the saffron-infused milk before adding it to the rice, ensuring no threads remain clumped. A colander works in a pinch, but its larger holes can let rice grains slip through.
Long-Handled Wooden Spoon
For stirring the marinade, caramelizing onions, and fluffing the final biryani, a long-handled wooden spoon (like the Ozeri Touch Natural) is a game-changer. The length keeps your hands away from the heat, and the wood won’t scratch your Dutch oven like metal utensils. I use it to gently fold the layers at the end, ensuring the rice and chicken blend without breaking the grains. Avoid plastic or silicone spoons—they can melt or degrade at high temperatures, contaminating your dish.
Aluminum Foil or Heavy-Duty Lid
If your Dutch oven doesn’t have a tight-fitting lid, heavy-duty aluminum foil is your secret weapon for dum cooking. Seal the foil tightly around the pot’s edges with water to create an airtight seal—this traps steam and flavors, mimicking the effect of a traditional clay pot. For extra insurance, double-layer the foil or use butterfly clamps to secure it. I’ve even used a ceramic lid (like those from Le Creuset) for an elegant touch, but foil is the most budget-friendly and effective option. Never skip this step—it’s what creates that signature biryani aroma and texture. ✨
Sharp Chef’s Knife
A sharp 8-inch chef’s knife (like the Wüsthof Ikon) is critical for thinly slicing onions and chopping fresh cilantro. For biryani, onions should be paper-thin to caramelize quickly and evenly. Dull knives crush the onions, releasing water and diluting the marinade’s flavor. I also use my knife to trim excess fat from chicken legs before marinating, ensuring a cleaner final presentation. Invest in a honing steel to maintain your knife’s edge—it makes all the difference in achieving professional results. 💡
Nutrition facts
Frequently asked questions
Can I substitute chicken with another protein for this 2 kg biryani?
For a vegetarian version, use extra-firm tofu or paneer marinated in yogurt and spices. For meat lovers, try lamb shoulder or beef chuck—both work beautifully with the same marinade. Just adjust cooking times: tofu needs 20 minutes extra in the marinade, while lamb requires 10-15 minutes longer to tenderize.
How do I prevent the biryani from becoming mushy?
Three key steps: Don't overcook the rice—stop at 70% doneness before layering, and use low heat during dum cooking. Second, press layers firmly to prevent steam gaps. Finally, rest for 15 minutes after cooking—this redistributes juices without overcooking. The secret is patience!
Can I make this biryani ahead of time?
Yes! Assemble the layers up to 24 hours ahead and refrigerate uncovered. When ready to cook, add 1 cup hot water to the pot, seal tightly, and cook on low heat for 45 minutes. This method prevents sogginess and enhances flavors. For freezing, portion into airtight containers and reheat by steaming for 20 minutes.
What's the best way to serve this biryani?
Present it in a large platter with the crispy bottom layer up—this is the most flavorful part! Serve with cooling raita (yogurt sauce), cucumber salad, and lemon wedges on the side. For extra drama, garnish with fried onions and fresh mint. The contrast of hot biryani with cool sides makes every bite perfect.
Why does my biryani smell amazing but taste bland?
This usually happens when spices aren't toasted or bloomed properly. Always toast whole spices (cumin, coriander) for 30 seconds before grinding, and bloom ground spices in oil for 1 minute to release flavors. Also, use high-quality saffron—cheap substitutes won't deliver that floral aroma. The marinade time is critical too—never skip the 4+ hour minimum.