
Main Courses
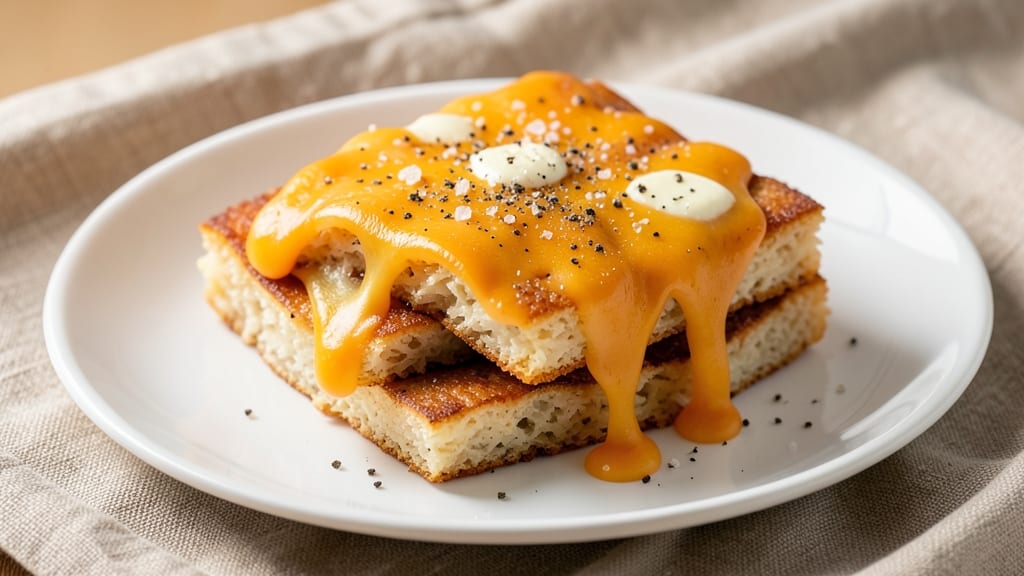
This cheesy rice cake recipe delivers the perfect balance of crispy edges and melted cheese goodness—ideal for a satisfying snack or appetizer. 🔥 The secret lies in using day-old rice cakes and a precise baking technique that transforms them into golden, crunchy bites with gooey cheese centers.
No fancy equipment needed, just simple ingredients and a little patience.
With just five basic components—rice cakes, shredded cheese, butter, and seasonings—you’ll create a dish that’s both comforting and impressive. The crispy exterior contrasts beautifully with the creamy, melted cheese inside, making every bite irresistible.
Perfect for game day, parties, or a quick snack, this recipe is foolproof and delivers restaurant-quality results at home.
Ingredients for cheesy rice cake
Five simple ingredients transform ordinary rice cakes into golden, crispy bites with gooey melted cheese centers.
| Ingredient | Amount | Notes |
|---|---|---|
| Day-Old Rice Cakes 🍞 | 12 whole | Square or round shape preferred |
| Shredded Sharp Cheddar Cheese 🧀 | 2 cups | Freshly shredded, not pre-shredded |
| Unsalted Butter 🧈 | ¼ cup | Melted for even coating |
| Diamond Crystal Kosher Salt 🧂 | ½ tsp | Fine grain for even distribution |
| Ground Black Pepper 🌶️ | ¼ tsp | Freshly ground for aroma |
| Garlic Powder 🧄 | ½ tsp | For subtle depth of flavor |
| Paprika 🌶️ | ¼ tsp | Smoked variety for color |
| Extra-Virgin Olive Oil 🫒 | 1 tbsp | For brushing rice cakes |
The rice cakes are the foundation—day-old works best for maximum crispiness. Square or round shapes hold their structure better during baking, but any variety will work. For the cheese, sharp cheddar is ideal—it melts beautifully and delivers that satisfying tang. Pre-shredded cheese contains anti-caking agents that prevent proper melting, so grate your own from a block. I always buy Kraft Natural or Cabot for the best texture. The butter needs to be melted completely—no lumps allowed, or your rice cakes will turn greasy instead of crispy.
No sharp cheddar? Monterey Jack or pepper jack are excellent alternatives—they melt smoothly and add different flavor profiles. Running short on butter? Olive oil or melted vegan butter works in a pinch, though the flavor will shift slightly. The seasonings are flexible: smoked paprika adds depth, but regular paprika works too. Freshly ground pepper is worth the extra 10 seconds—pre-ground loses potency fast. For a spicy kick, add a pinch of cayenne or red pepper flakes. The olive oil is optional but recommended—it helps the cheese adhere better and adds a subtle fruity note to the final bite.
Store any leftovers in an airtight container between layers of parchment paper to maintain crispiness for up to 3 days. For longer storage, freeze portions on a baking sheet before transferring to a bag—this prevents them from sticking. Reheat at 350°F for 3-5 minutes until the cheese is bubbly again. These reheat beautifully, making them perfect for meal prep. Portion into single servings before freezing for effortless snacking.
Why You'll Love This Recipe
- I’ll be real: this recipe costs me pennies. A block of cheddar and a bag of rice cakes go a long way, and I can stretch them into multiple meals. Plus, no fancy techniques—just butter, salt, and a little patience. That’s my kind of frugal win.
- Pantry Magic: I swear by this one—no fresh ingredients needed. Just pull out those stale rice cakes from last night’s takeout and turn them into something crispy and golden. The butter and cheese melt into a gooey blanket, but the rice cakes stay sturdy enough to cut into squares.
- Cheese Pull Heaven: That sharp cheddar isn’t just melted—it stretches and pulls when you cut into it. Honestly, the first time I tried this, I nearly dropped my fork. The salt and pepper punch through the richness, so every bite is bold without being heavy.
- Lunchbox Hero: Between us, this is my go-to for packed lunches. Toss a few squares in a container, and they stay crispy for days. (Yes, even on a Tuesday night when you’re too tired to think.) The kids won’t even notice it’s "leftovers"—they’ll just ask for more.
Step-by-step instructions for crispy cheesy rice cakes
Transform simple rice cakes into golden, cheesy bites with perfect texture every time.
🔥 Step 1: Preheat and Prepare the Baking Surface
Preheat your oven to 400°F for 5 minutes to ensure even cooking. Line a baking sheet with parchment paper or use a silicone baking mat—this prevents sticking and makes cleanup effortless. Arrange the 12 whole day-old rice cakes in a single layer, leaving about ½ inch between each one. The spacing ensures even browning and crisping on all sides.
While the oven preheats, melt the 0.25 cup unsalted butter in a microwave-safe bowl in 30-second intervals, stirring between each interval until completely smooth. This melted butter will create the perfect binding agent for the cheese mixture. Keep it warm but not hot—just enough to coat a spoon easily.
👨🍳 Step 2: Create the Cheese Seasoning Blend
In a medium bowl, combine the 2 cups shredded sharp cheddar cheese, 0.5 teaspoon diamond crystal kosher salt, 0.25 teaspoon ground black pepper, 0.5 teaspoon garlic powder, and 0.25 teaspoon paprika. Use your hands to work the seasonings into the cheese until fully distributed—this ensures every bite has balanced flavor. The sharp cheddar should be freshly shredded (not pre-shredded) for the best melt and texture.
Here's the thing—don't overmix. Just enough to blend the spices evenly. The cheese should look like it has a light, even coating of seasoning, not a paste. This step is where the magic happens: the paprika adds color, the garlic powder builds depth, and the salt enhances all the flavors. Taste a pinch to confirm the seasoning is balanced before proceeding.
🍳 Step 3: Assemble and Brush the Rice Cakes
Working quickly, brush each rice cake lightly with the 1 tablespoon extra-virgin olive oil using a pastry brush or your fingers. The oil creates a barrier that helps the cheese adhere and promotes crispiness. Don't oversaturate—just enough to coat the surface evenly. I like to work in batches to keep everything fresh while I assemble.
Next, press about 1 tablespoon of the cheese mixture onto each rice cake, covering the top and sides completely. The cheese should stick to the oiled surface easily—if it doesn't, add a tiny bit more olive oil to the next one. This is where crispy edges meet melty cheese perfection. For even coverage, I use my fingers to gently press the cheese into the rice cake's texture, ensuring every nook gets filled.
🔥 Step 4: Bake Until Golden and Crispy
Place the assembled rice cakes on the preheated baking sheet and transfer them to the oven. Bake for 8-10 minutes until the cheese is fully melted and the edges are deep golden brown. This is the moment that matters: you want the rice cakes to develop a crispy texture while the cheese inside remains gooey and stretchy. Watch closely after 7 minutes—ovens vary, and you don't want to burn the cheese.
If you notice any spots browning too quickly, rotate the baking sheet halfway through. The cheese should pull away slightly from the edges, creating that perfect crispy shell. When you remove them from the oven, the rice cakes should hold their shape but still feel slightly soft to the touch—this indicates they're ready to serve. If they're not crispy enough, return them to the oven for 1-2 minutes to finish.
⏰ Step 5: Rest and Serve Warm
Let the cheesy rice cakes rest for 2-3 minutes before serving. This brief resting period allows the cheese to set slightly, making them easier to handle without losing their crispy edges. Serve them immediately while still warm—the contrast of the crispy exterior and melted cheese inside is what makes this dish irresistible.
For maximum enjoyment, pair them with a simple side like a fresh tomato salad or a dollop of sour cream. The crispy texture holds up well, so you can even enjoy them as a snack throughout the day. The key to success here is timing: crispy edges require quick baking, while melty cheese needs just enough time to transform. You've got this—it's easier than it looks!
Pro Tips For Making Cheesy Rice Cake
- CRUMBLE THE CAKES FIRST: Day-old rice cakes are stubborn—don’t just toss them in. Break them into ½-inch chunks with your hands (or a knife if you’re impatient) so they crisp evenly. I used to skip this and ended up with uneven, soggy bits in the middle.
- USE COLD BUTTER: Melt the butter just until it’s liquid, then let it cool for 2 minutes before mixing with the cheese. Warm butter melts the cheese too fast, turning your rice cakes into a gluey mess. Cold butter gives you time to work without losing texture.
- SALT THE CHEESE: Sprinkle a pinch of kosher salt directly into the shredded cheddar before mixing—this cuts through the sharpness and balances the flavor. I learned this after making a batch where the cheese tasted one-note, even though I’d salted the final dish.
- PRESS THEM FIRM: When shaping the mixture into cakes, pack them tightly in the pan—don’t just drop spoonfuls. A little pressure ensures they hold together without crumbling when flipping. (Yes, even if it feels like overkill.)
Serving suggestions for leftovers
Game Day Bites
These cheesy rice cakes are perfect for game day snacking—easy to eat with one hand while keeping the other busy with the remote. Arrange them on a platter with toothpicks for easy grabbing, and add a small bowl of marinara sauce or spicy mayo for dipping.
I love setting up a DIY station with mini bowls of toppings like chopped green onions, jalapeños, or hot honey for guests to customize their bites. 🔥
Appetizer Platter
Elevate your appetizer game by arranging the cheesy rice cakes on a wooden serving board alongside other finger foods like bruschetta, spinach-artichoke dip, and crudité. The crispy texture contrasts beautifully with soft dips, making it a crowd-pleaser.
For a festive touch, sprinkle edible gold leaf or crushed pistachios on top before serving. Serve with chilled sparkling water or light beer to balance the richness.
Breakfast Boost
Start your day with these cheesy bites as a savory breakfast option. Pair them with a scrambled egg or sausage patty for a protein-packed meal. The crispy texture adds a fun twist to morning routines, especially for kids.
I often serve them with a side of fresh fruit (like berries or sliced apples) to balance the richness. For a heartier breakfast, add a drizzle of maple syrup or a dash of hot sauce for a sweet-and-spicy kick.
Lunchbox Upgrade
Pack these cheesy rice cakes in airtight containers with a small side of ranch dressing or hummus for a satisfying lunch. They hold their crispiness well in containers, making them perfect for meal prep. Add a handful of baby carrots or whole-grain crackers for a balanced, portable meal.
The cheese stays melty for hours, so they’re ideal for school lunches or office snacks. Just reheat in the microwave for 15-20 seconds if they lose crispiness.
Dessert Twist
For a sweet surprise, swap the cheddar for white cheddar and add a sprinkle of cinnamon and brown sugar before baking. Top with a drizzle of caramel or chocolate sauce for a dessert version.
These sweet cheesy bites pair perfectly with coffee or tea for an after-dinner treat. The contrast of crispy and gooey makes them irresistible—just don’t blame me if they disappear too fast! 💫
Party Snack Station
Turn your snack table into a build-your-own station with mini bowls of cheese blends, herbs, and spices. Let guests assemble their own cheesy rice cakes with toppings like crumbled bacon, sun-dried tomatoes, or fresh basil.
This interactive setup is a hit at parties and keeps everyone engaged. Serve with sparkling cider or wine spritzers to complement the flavors. The best part? You can prep the rice cakes ahead and let guests customize them tableside.
Nutrition facts
Frequently asked questions
Why do I need day-old rice cakes for this recipe?
Fresh rice cakes contain too much moisture, which prevents them from getting crispy. Day-old rice cakes have dried out enough to develop that satisfying crunch while still holding their shape. If you only have fresh ones, spread them on a baking sheet and bake at 200°F for 10 minutes to dry them out before making the cheesy version.
Can I use pre-shredded cheese in this recipe?
Pre-shredded cheese contains anti-caking agents that prevent proper melting, resulting in grainy texture. For best results, always use freshly shredded cheese from a block. If you're short on time, try pre-shredded mozzarella—it melts better than most pre-shredded varieties, though it won't be as sharp in flavor.
How do I prevent the cheese from sliding off the rice cakes?
Lightly brush each rice cake with olive oil before adding cheese—this creates a sticky surface that helps the cheese adhere. For extra grip, chill the assembled rice cakes in the fridge for 10 minutes before baking. If cheese still slides, try using a tiny bit of melted butter as "glue" between the rice cake and cheese mixture.
Can I make these cheesy rice cakes ahead of time?
Assemble them completely, then refrigerate on a baking sheet for up to 24 hours before baking. For longer storage, freeze the assembled rice cakes (unbaked) between parchment paper for up to 1 month. Thaw in the fridge overnight before baking. The texture holds up well when reheated from frozen at 375°F for 12-15 minutes.
What's the best way to reheat leftover cheesy rice cakes?
For crispy edges, place them on a baking sheet and warm at 350°F for 3-5 minutes until the cheese is bubbly again. In a microwave, cover with a damp paper towel and heat for 15-20 seconds (they'll lose some crispiness). For maximum crunch, air fry at 375°F for 2 minutes—this restores both texture and flavor beautifully.